Common Reasons for App Signing on Both Platforms:
Authentication:
- App signing provides a mechanism for authenticating the source of the app. Users and systems can trust that the app comes from the stated developer.
Preventing Tampering:
- App signing helps prevent unauthorized modifications to the app. If the app's binary or resources are altered, the signature won't match, and the system will reject the app.
Ensuring Updates:
- With app signing, updates can be delivered securely. The platform can verify that the update is signed by the same entity that signed the original app.
APP SIGNING PROCESS IN IOS
App signing in iOS involves the use of digital signatures to verify the authenticity and integrity of an app. This process is an integral part of the code signing mechanism in iOS development. Here are the key steps involved in app signing for iOS:
Create a Certificate Signing Request (CSR):
- Before you can sign your app, you need a certificate. To obtain a certificate, you start by creating a Certificate Signing Request (CSR) using the Keychain Access tool on your Mac. The CSR is used to request a signing certificate from Apple.
Obtain an Apple Developer Account:
- To sign and distribute iOS apps, you need to enroll in the Apple Developer Program. This program provides you with the necessary tools, certificates, and provisioning profiles.
Request a Developer Certificate:
- Using your CSR, request a developer certificate through the Apple Developer portal. This certificate is used to sign your app during the development and testing phases.
Create an App ID:
- An App ID uniquely identifies your app. You need to create an App ID in the Apple Developer portal for your iOS app. The App ID is associated with a bundle identifier that is specified in your Xcode project.
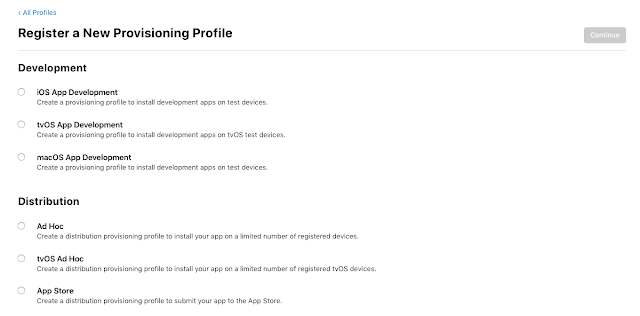
Create Provisioning Profiles:
- Provisioning profiles specify which devices are allowed to run your app during development and testing. You need to create provisioning profiles in the Apple Developer portal, associating them with your App ID and developer certificate.
Configure Code Signing in Xcode:
- In your Xcode project settings, configure the code signing settings. Set the correct provisioning profile and code signing identity (developer certificate) for both the Debug and Release build configurations.
Build and Archive:
- Build your app using Xcode. When you archive your app for distribution, Xcode signs the app bundle with the selected code signing identity and includes the provisioning profile.
Submit to the App Store or Distribute Ad Hoc:
- If you are distributing your app through the App Store, you will submit the signed archive using Xcode's Organizer. If you are distributing the app for testing purposes (Ad Hoc distribution), you can use tools like TestFlight or distribute the IPA file to authorized devices.
App Store Connect:
- For App Store distribution, the app goes through the App Store Connect portal, where you provide additional information, set up app pricing, and manage the release.


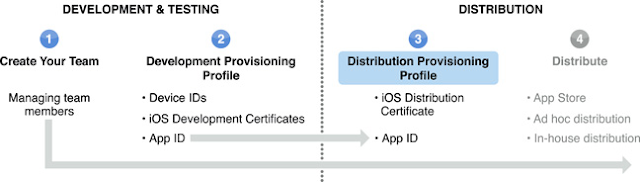
A Distribution Provisioning Profile is a combination of your App ID and Distribution Certificates. It authorizes your app to use particular services (like Push Notifications) and ensures that your app is submitted by you. This is why Distribution Certificates are tied to a specific Mac.
References
https://developer.apple.com/library/archive/documentation/ToolsLanguages/Conceptual/DevPortalGuide/CreatingandDownloadingaDistributionProvisioningProfile/CreatingandDownloadingaDistributionProvisioningProfile.html
Comments
Post a Comment